Click any blue title to open the online video guide
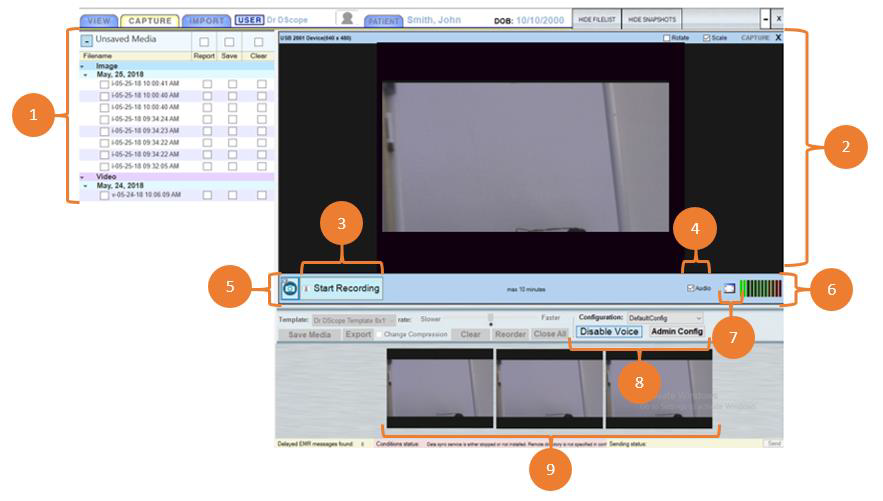
1. Unsaved Media List
- Captured Videos and Images will populate this list immediately after being created. You can review, save, delete, and edit unsaved media in the View Tab and create reports with that media.
2. Capture Tab
- This window will display the live video feed of the current set-up capture device and the feed during capture and snapshot-taking.
3. Start/Stop/Resume Recording
- If a capture device is set up, click this button to begin recording. After recording has begun, the (Stop Recording) and (Pause/Resume Recording) buttons will appear to its right. Click those buttons to elicit their functions.
4. Enable Audio Recording
- Click the white box next to “Audio” to enable audio recording. If this box is checked and an audio capture device is set up in Admin Config, recording a video will capture audio simultaneously.
5. Snapshot Button
- Whether recording is in progress or not, clicking the snapshot button will take a snapshot of the Capture Window feed’s current frame. Captured snapshots will appear in the Unsaved Media List and the Snapshot Tray. They can then be accessed from the View Tab.
6. Decibel Tracker
- Whether recording is in progress or not, this tracker is visible when the audio checkbox is selected. It will show the viewer the level of sound being registered into the microphone.
7. Full-Screen Mode
- Click the Full-Screen Icon to enter Full-Screen Mode. In this mode, the video feed will display in full screen whether the recording is in progress or not. To exit full-screen mode, either press (Esc) on your keyboard or click the full-screen button again.
8. Disable Voice and Admin Config. Buttons
- The Disable Voice button allows the user to control if voice controls can be acted upon within the D-scope application.
- The Admin Config. The button creates a pop-up window where the user would then login with their credentials to alter the user’s settings.
9. Snapshot Tray
- Recently taken snapshots will display in this tray as previews. Enter the View Tab and click the desired snapshots in either the Snapshot Tray or the Unsaved Media List to access them
