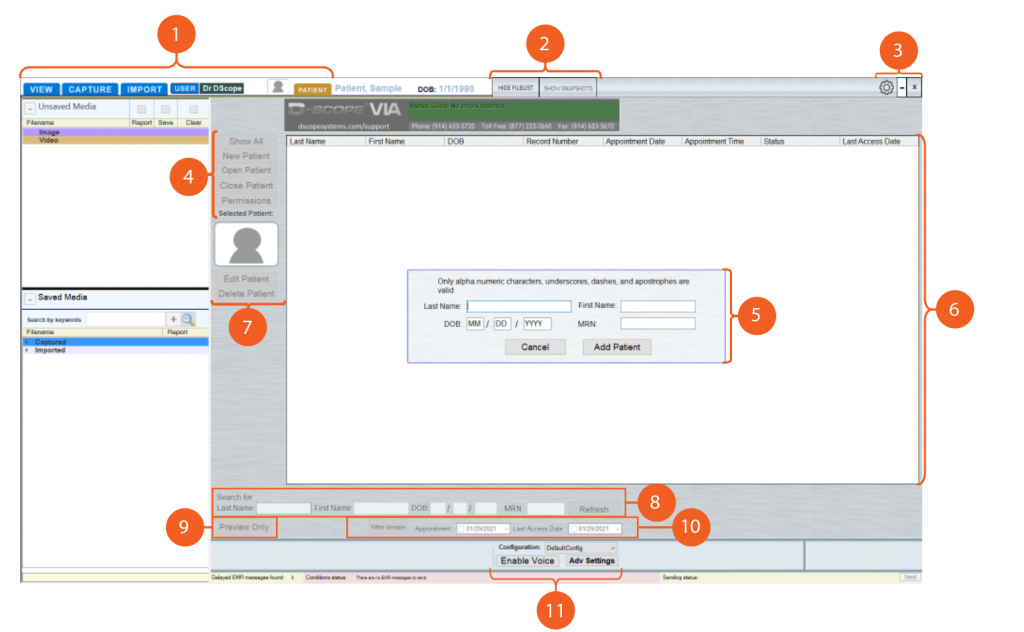
Click any blue title to open the online video guide
1. Tabs
- View: Click to open the View Tab for reviewing, saving, editing, exporting, and deleting media, as well as creating reports.
- Capture: Click to open the Capture Tab for recording video and audio, as well as taking snapshots.
- Import: Click to open the Import Tab for importing images, videos, radiology files, and reports.
- User: Click to open the Login Screen for switching between user accounts and to log off.
- Patient: Click to open the Patient Tab (currently displayed above) for creating, editing, deleting, and merging patients, as well as moving media between patients as well as altering user/ Patient permission.
2. Hide Buttons
- Hide File list: Clicking this button will cause the left panel to disappear, and clicking it again will bring the panel back. This panel contains the sections labeled “Save Media” and “Unsaved Media.”
- Hide Snapshots: This Button is disabled in the patient tab and Capture Tab. But in the other tabs, View and Import the Show Snapshot brings up recent snapshots taken from the selected patient.
3. Exiting the D-Scope Application
- Click the (-) button to minimize the D-Scope Application.
- Click the (x) button to exit the D-Scope Application. You will be prompted to save any unsaved media and backup your database before exiting completely.
- Click on the gear and it will take you to Advanced Settings to make any changes to audio, video, and any other D-scope user changes.
4. Patient Functions
- Show All/ Hide All: Click to show or hide all available patients in the Patient List Window.
- New Patient: Click to create a new patient on the current user’s account. Last name, first name, and date of birth are required. You can also add a patient’s MRN id needed.
- Open Patient: Click to open the currently- highlighted patient in the Patient List Window. This brings directly to the Capture tab to start recording.
- Close Patient: Click to exit the file of a patient that was previously opened.
- Permissions: Click to give other doctors using the database access to patient information.
5. New Patient Creation Window
- Click (New Patient) in the Patient Functions to access this window.
- After entering a new patient’s first name, last name, and date of birth (including any leading zeroes), click. (Add Patient) in the New Patient, Creation Window to add that patient to the Patient List Window.
6. Patient List Window
- This window displays all the patients available to the current user. i.e., Last Name, First Name, DOB, Record Number, Appointment Date, Appointment Time, Status, and the Last Access Date.
- Click (Show All/Hide All) in the Patient Functions to show or hide the available patients.
- Click (Permissions) in the Patient Functions to decide which other users will access the current user’s patients.
7. Patient Editing Tools
- Click Edit Patient to alter or update the highlighted patient’s first name, last name, or birth date.
- Click Delete Patient to delete the highlighted patient and all the media in their profile.
- Click the avatar above the (Edit Patient) button to open the Patient Snapshot Window. From here, if you have a camera set up, you can take a snapshot, which will serve as the highlighted patient’s D-Scope profile picture.
8. Patient List Filtering
- These boxes may be used to filter patients in the Patient List Window. You can filter by first name, last name, date of birth, MRN, or any combination. After entering your filter values, click the (Refresh) button to apply them to the Patient List.
9. Preview Only Mode
- Click (Preview Only) to enable Preview Only Mode. In this mode, if a camera is set up, you will be able to see the live video feed in D-Scope and utilize the camera on a large screen without opening a patient or entering the Capture Tab. You will not be able to record or take snapshots from Preview Only Mode.
- In the Preview Only Mode, you can also change the settings in Adv settings, change your Configuration and Enable and Disable Voice command.
10. Patient List Filtering
- These boxes may be used to filter patients in the Patient List Window. You can filter by appointment date or the last date a patient’s profile was accessed.
- Clicking (Filter Groups) will open the Filter-by-Doctor window. If your user account has permission to view other doctors’ patients, you can use this window to filter patients by their associated doctor.
11. Configuration Options
- If you have administrative rights, you can click (Admin Config) to access administrative options
- If you have a saved configuration of administrative options, you may toggle between those option configurations using the “Configuration” dropdown menu.
- Click (Disable/ Enable Voice) to disable or enable the voice command function if voice commands have been enabled in Admin Config.
- Advanced Settings you will be able to go into settings and make any changes to audio, video, and any other D-scope user changes.
